The Compiler Frontend: Parsing and Type Checking
Compiling source code into executable programs involves a fairly complex set of libraries, linkers, and assemblers. It’s important to understand how these fit together to help with your day-to-day workflow of developing, debugging, and deploying applications.
OCaml has a strong emphasis on static type safety and rejects source code that doesn’t meet its requirements as early as possible. The compiler does this by running the source code through a series of checks and transformations. Each stage performs its job (e.g., type checking, optimization, or code generation) and discards some information from the previous stage. The final native code output is low-level assembly code that doesn’t know anything about the OCaml modules or objects that the compiler started with.
You don’t have to do all of this manually, of course. The compiler frontends (ocamlc and ocamlopt) are invoked via the command line and chain the stages together for you. Sometimes though, you’ll need to dive into the toolchain to hunt down a bug or investigate a performance problem. This chapter explains the compiler pipeline in more depth so you understand how to harness the command-line tools effectively.
In this chapter, we’ll cover the following topics:
The compilation pipeline and what each stage represents
The type-checking process, including module resolution
The details of the compilation process into executable code can be found next, in Chapter 24, The Compiler Backend Byte Code And Native Code.
An Overview of the Toolchain
The OCaml tools accept textual source code as input, using the filename extensions .ml and .mli for modules and signatures, respectively. We explained the basics of the build process in Chapter 4, Files Modules And Programs, so we’ll assume you’ve built a few OCaml programs already by this point.
Each source file represents a compilation unit that is built separately. The compiler generates intermediate files with different filename extensions to use as it advances through the compilation stages. The linker takes a collection of compiled units and produces a standalone executable or library archive that can be reused by other applications.
The overall compilation pipeline looks like this:
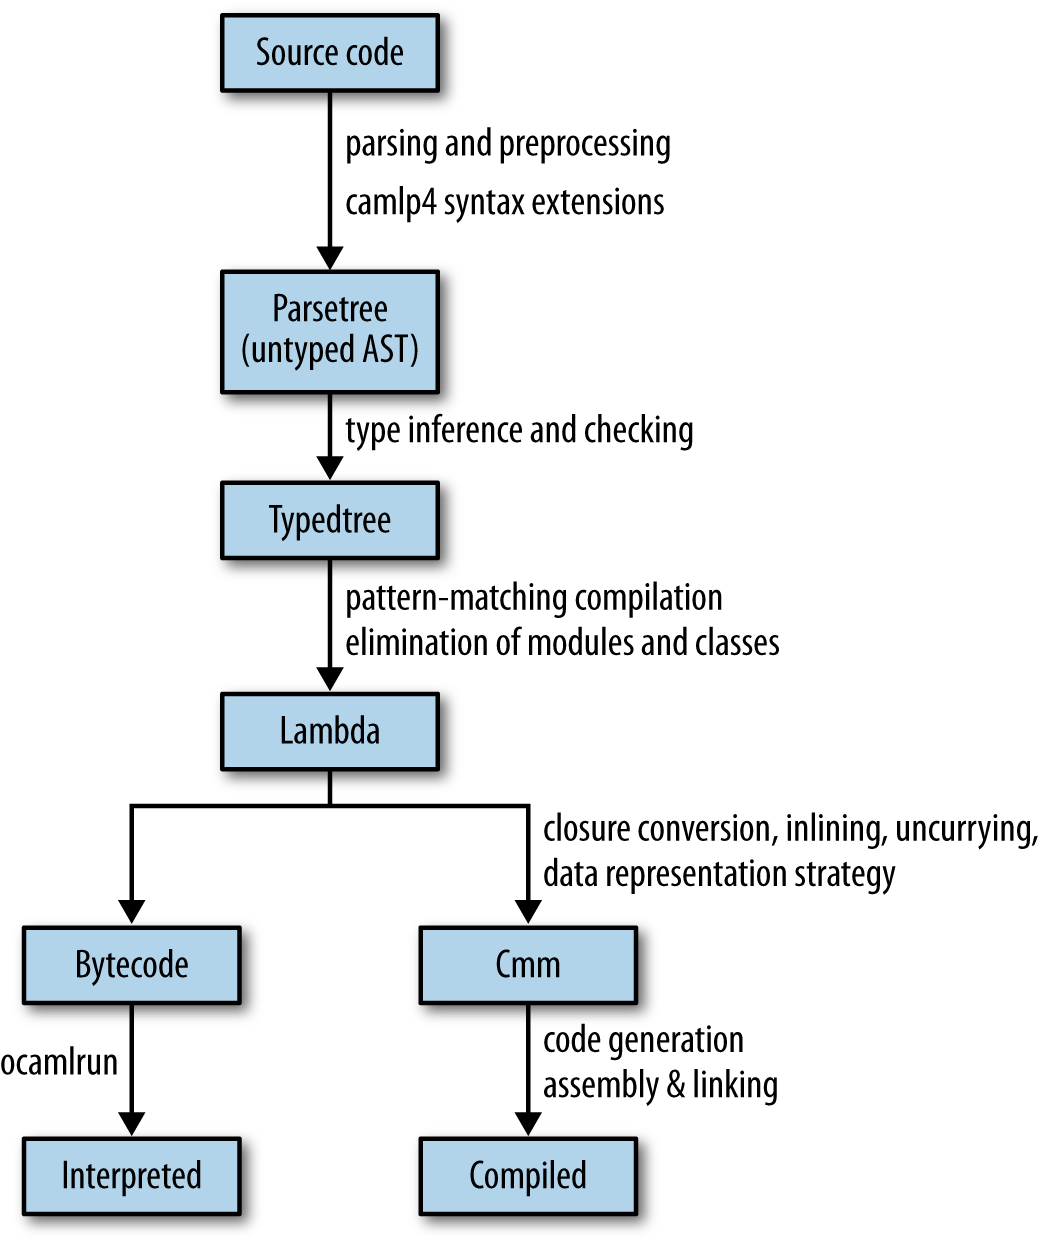
Notice that the pipeline branches toward the end. OCaml has multiple compiler backends that reuse the early stages of compilation but produce very different final outputs. The bytecode can be run by a portable interpreter and can even be transformed into JavaScript (via js_of_ocaml) or C source code (via OCamlCC). The native code compiler generates specialized executable binaries suitable for high-performance applications.
Obtaining the Compiler Source Code
Although it’s not necessary to understand the examples, you may find it useful to have a copy of the OCaml source tree checked out while you read through this chapter. The source code is available from multiple places:
Stable releases as zip and tar archives from the OCaml download site
A Git repository with all the history and development branches included, browsable online at GitHub
The source tree is split up into subdirectories. The core compiler consists of:
config/- Configuration directives to tailor OCaml for your operating system and architecture.
bytecomp/- Bytecode compiler that converts OCaml into an interpreted executable format.
asmcomp/- Native-code compiler that converts OCaml into high performance native code executables.
parsing/- The OCaml lexer, parser, and libraries for manipulating them.
typing/- The static type checking implementation and type definitions.
driver/- Command-line interfaces for the compiler tools.
A number of tools and scripts are also built alongside the core compiler:
debugger/- The interactive bytecode debugger.
toplevel/- Interactive top-level console.
emacs/- A caml-mode for the Emacs editor.
stdlib/- The compiler standard library, including the
Pervasivesmodule. ocamlbuild/- Build system that automates common OCaml compilation modes.
otherlibs/- Optional libraries such as the Unix and graphics modules.
tools/- Command-line utilities such as
ocamldepthat are installed with the compiler. testsuite/- Regression tests for the core compiler.
We’ll go through each of the compilation stages now and explain how they will be useful to you during day-to-day OCaml development.
Parsing Source Code
When a source file is passed to the OCaml compiler, its first task is to parse the text into a more structured abstract syntax tree (AST). The parsing logic is implemented in OCaml itself using the techniques described earlier in Chapter 17, Parsing With Ocamllex And Menhir. The lexer and parser rules can be found in the parsing directory in the source distribution.
Syntax Errors
The OCaml parser’s goal is to output a well-formed AST data structure to the next phase of compilation, and so it any source code that doesn’t match basic syntactic requirements. The compiler emits a syntax error in this situation, with a pointer to the filename and line and character number that’s as close to the error as possible.
Here’s an example syntax error that we obtain by performing a module assignment as a statement instead of as a let binding:
let () =
  module MyString = String;
  ()
The code results in a syntax error when compiled:
ocamlc -c broken_module.ml
>File "broken_module.ml", line 2, characters 2-8:
>2 |   module MyString = String;
>      ^^^^^^
>Error: Syntax error
[2]
The correct version of this source code creates the MyString module correctly via a local open, and compiles successfully:
let () =
  let module MyString = String in
  ()
The syntax error points to the line and character number of the first token that couldn’t be parsed. In the broken example, the module keyword isn’t a valid token at that point in parsing, so the error location information is correct.
Automatically Indenting Source Code
Sadly, syntax errors do get more inaccurate sometimes, depending on the nature of your mistake. Try to spot the deliberate error in the following function definitions:
let concat_and_print x y =
  let v = x ^ y in
  print_endline v;
  v;

let add_and_print x y =
  let v = x + y in
  print_endline (string_of_int v);
  v

let () =
  let _x = add_and_print 1 2 in
  let _y = concat_and_print "a" "b" in
  ()
When you compile this file, you’ll get a syntax error again:
ocamlc -c follow_on_function.ml
>File "follow_on_function.ml", line 11, characters 0-3:
>11 | let () =
>     ^^^
>Error: Syntax error
[2]
The line number in the error points to the end of the add_and_print function, but the actual error is at the end of the first function definition. There’s an extra semicolon at the end of the first definition that causes the second definition to become part of the first let binding. This eventually results in a parsing error at the very end of the second function.
This class of bug (due to a single errant character) can be hard to spot in a large body of code. Luckily, there’s a great tool available via OPAM called ocp-indent that applies structured indenting rules to your source code on a line-by-line basis. This not only beautifies your code layout, but it also makes this syntax error much easier to locate.
Let’s run our erroneous file through ocp-indent and see how it processes it:
ocp-indent follow_on_function.ml
>let concat_and_print x y =
>  let v = x ^ y in
>  print_endline v;
>  v;
>
>  let add_and_print x y =
>    let v = x + y in
>    print_endline (string_of_int v);
>    v
>
>let () =
>  let _x = add_and_print 1 2 in
>  let _y = concat_and_print "a" "b" in
>  ()
The add_and_print definition has been indented as if it were part of the first concat_and_print definition, and the errant semicolon is now much easier to spot. We just need to remove that semicolon and rerun ocp-indent to verify that the syntax is correct:
ocp-indent follow_on_function_fixed.ml
>(*TODO: Check contents*)
>let concat_and_print x y =
>  let v = x ^ y in
>  print_endline v;
>  v
>
>let add_and_print x y =
>  let v = x + y in
>  print_endline (string_of_int v);
>  v
>
>let () =
>  let _x = add_and_print 1 2 in
>  let _y = concat_and_print "a" "b" in
>  ()
The ocp-indent homepage documents how to integrate it with your favorite editor. All the Core libraries are formatted using it to ensure consistency, and it’s a good idea to do this before publishing your own source code online.
Generating Documentation from Interfaces
Whitespace and source code comments are removed during parsing and aren’t significant in determining the semantics of the program. However, other tools in the OCaml distribution can interpret comments for their own ends.
The ocamldoc tool uses specially formatted comments in the source code to generate documentation bundles. These comments are combined with the function definitions and signatures, and output as structured documentation in a variety of formats. It can generate HTML pages, LaTeX and PDF documents, UNIX manual pages, and even module dependency graphs that can be viewed using Graphviz.
Here’s a sample of some source code that’s been annotated with ocamldoc comments:
(** example.ml: The first special comment of the file is the comment
    associated with the whole module. *)

(** Comment for exception My_exception. *)
exception My_exception of (int -> int) * int

(** Comment for type [weather]  *)
type weather =
  | Rain of int (** The comment for construtor Rain *)
  | Sun         (** The comment for constructor Sun *)

(** Find the current weather for a country
    @author Anil Madhavapeddy
    @param location The country to get the weather for.
*)
let what_is_the_weather_in location =
  match location with
  | `Cambridge  -> Rain 100
  | `New_york   -> Rain 20
  | `California -> Sun
The ocamldoc comments are distinguished by beginning with the double asterisk. There are formatting conventions for the contents of the comment to mark metadata. For instance, the @tag fields mark specific properties such as the author of that section of code.
Try compiling the HTML documentation and UNIX man pages by running ocamldoc over the source file:
$ mkdir -p html man/man3
$ ocamldoc -html -d html doc.ml
$ ocamldoc -man -d man/man3 doc.ml
$ man -M man Doc
You should now have HTML files inside the html/ directory and also be able to view the UNIX manual pages held in man/man3. There are quite a few comment formats and options to control the output for the various backends. Refer to the OCaml manual for the complete list.
Using Custom ocamldoc Generators
The default HTML output stylesheets from ocamldoc are pretty spartan and distinctly Web 1.0. The tool supports plugging in custom documentation generators, and there are several available that provide prettier or more detailed output:
Argot is an enhanced HTML generator that supports code folding and searching by name or type definition.
ocamldoc generators add support for Bibtex references within comments and generating literate documentation that embeds the code alongside the comments.
JSON output is available via a custom generator in Xen.
Static Type Checking
After obtaining a valid abstract syntax tree, the compiler has to verify that the code obeys the rules of the OCaml type system. Code that is syntactically correct but misuses values is rejected with an explanation of the problem.
Although type checking is done in a single pass in OCaml, it actually consists of three distinct steps that happen simultaneously:
- automatic type inference
- An algorithm that calculates types for a module without requiring manual type annotations
- module system
- Combines software components with explicit knowledge of their type signatures
- explicit subtyping
- Checks for objects and polymorphic variants
Automatic type inference lets you write succinct code for a particular task and have the compiler ensure that your use of variables is locally consistent.
Type inference doesn’t scale to very large codebases that depend on separate compilation of files. A small change in one module may ripple through thousands of other files and libraries and require all of them to be recompiled. The module system solves this by providing the facility to combine and manipulate explicit type signatures for modules within a large project, and also to reuse them via functors and first-class modules.
Subtyping in OCaml objects is always an explicit operation (via the :> operator). This means that it doesn’t complicate the core type inference engine and can be tested as a separate concern.
Displaying Inferred Types from the Compiler
We’ve already seen how you can explore type inference directly from the toplevel. It’s also possible to generate type signatures for an entire file by asking the compiler to do the work for you. Create a file with a single type definition and value:
type t = Foo | Bar
let v = Foo
Now run the compiler with the -i flag to infer the type signature for that file. This runs the type checker but doesn’t compile the code any further after displaying the interface to the standard output:
The output is the default signature for the module that represents the input file. It’s often useful to redirect this output to an mli file to give you a starting signature to edit the external interface without having to type it all in by hand.
The compiler stores a compiled version of the interface as a cmi file. This interface is either obtained from compiling an mli signature file for a module, or by the inferred type if there is only an ml implementation present.
The compiler makes sure that your ml and mli files have compatible signatures. The type checker throws an immediate error if this isn’t the case:
type t = Footype t = Barocamlc -c conflicting_interface.mli conflicting_interface.ml
>File "conflicting_interface.ml", line 1:
>Error: The implementation conflicting_interface.ml
> does not match the interface conflicting_interface.cmi:
> Type declarations do not match:
> type t = Foo
> is not included in
> type t = Bar
> Constructors number 1 have different names, Foo and Bar.
> File "conflicting_interface.mli", line 1, characters 0-12:
> Expected declaration
> File "conflicting_interface.ml", line 1, characters 0-12:
> Actual declaration
[2]Which Comes First: The ml or the mli?
There are two schools of thought on which order OCaml code should be written in. It’s very easy to begin writing code by starting with an ml file and using the type inference to guide you as you build up your functions. The mli file can then be generated as described, and the exported functions documented.
If you’re writing code that spans multiple files, it’s sometimes easier to start by writing all the mli signatures and checking that they type-check against one another. Once the signatures are in place, you can write the implementations with the confidence that they’ll all glue together correctly, with no cyclic dependencies among the modules.
As with any such stylistic debate, you should experiment with which system works best for you. Everyone agrees on one thing though: no matter in what order you write them, production code should always explicitly define an mli file for every ml file in the project. It’s also perfectly fine to have an mli file without a corresponding ml file if you’re only declaring signatures (such as module types).
Signature files provide a place to write succinct documentation and to abstract internal details that shouldn’t be exported. Maintaining separate signature files also speeds up incremental compilation in larger code bases, since recompiling a mli signature is much faster than a full compilation of the implementation to native code.
Type Inference
Type inference is the process of determining the appropriate types for expressions based on their use. It’s a feature that’s partially present in many other languages such as Haskell and Scala, but OCaml embeds it as a fundamental feature throughout the core language.
OCaml type inference is based on the Hindley-Milner algorithm, which is notable for its ability to infer the most general type for an expression without requiring any explicit type annotations. The algorithm can deduce multiple types for an expression and has the notion of a principal type that is the most general choice from the possible inferences. Manual type annotations can specialize the type explicitly, but the automatic inference selects the most general type unless told otherwise.
OCaml does have some language extensions that strain the limits of principal type inference, but by and large, most programs you write will never require annotations (although they sometimes help the compiler produce better error messages).
Adding type annotations to find errors
It’s often said that the hardest part of writing OCaml code is getting past the type checker—but once the code does compile, it works correctly the first time! This is an exaggeration of course, but it can certainly feel true when moving from a dynamically typed language. The OCaml static type system protects you from certain classes of bugs such as memory errors and abstraction violations by rejecting your program at compilation time rather than by generating an error at runtime. Learning how to navigate the type checker’s compile-time feedback is key to building robust libraries and applications that take full advantage of these static checks.
There are a couple of tricks to make it easier to quickly locate type errors in your code. The first is to introduce manual type annotations to narrow down the source of your error more accurately. These annotations shouldn’t actually change your types and can be removed once your code is correct. However, they act as anchors to locate errors while you’re still writing your code.
Manual type annotations are particularly useful if you use lots of polymorphic variants or objects. Type inference with row polymorphism can generate some very large signatures, and errors tend to propagate more widely than if you are using more explicitly typed variants or classes.
For instance, consider this broken example that expresses some simple algebraic operations over integers:
let rec algebra =
  function
  | `Add (x,y) -> (algebra x) + (algebra y)
  | `Sub (x,y) -> (algebra x) - (algebra y)
  | `Mul (x,y) -> (algebra x) * (algebra y)
  | `Num x     -> x

let _ =
  algebra (
    `Add (
      (`Num 0),
      (`Sub (
          (`Num 1),
          (`Mul (
              (`Nu 3),(`Num 2)
            ))
        ))
    ))
There’s a single character typo in the code so that it uses Nu instead of Num. The resulting type error is impressive:
ocamlc -c broken_poly.ml
>File "broken_poly.ml", lines 9-18, characters 10-6:
> 9 | ..........(
>10 |     `Add (
>11 |       (`Num 0),
>12 |       (`Sub (
>13 |           (`Num 1),
>14 |           (`Mul (
>15 |               (`Nu 3),(`Num 2)
>16 |             ))
>17 |         ))
>18 |     ))
>Error: This expression has type
>         [> `Add of
>              ([< `Add of 'a * 'a
>                | `Mul of 'a * 'a
>                | `Num of int
>                | `Sub of 'a * 'a
>                > `Num ]
>               as 'a) *
>              [> `Sub of 'a * [> `Mul of [> `Nu of int ] * [> `Num of int ] ]
>              ] ]
>       but an expression was expected of type
>         [< `Add of 'a * 'a | `Mul of 'a * 'a | `Num of int | `Sub of 'a * 'a
>          > `Num ]
>         as 'a
>       The second variant type does not allow tag(s) `Nu
[2]
The type error is perfectly accurate, but rather verbose and with a line number that doesn’t point to the exact location of the incorrect variant name. The best the compiler can do is to point you in the general direction of the algebra function application.
This is because the type checker doesn’t have enough information to match the inferred type of the algebra definition to its application a few lines down. It calculates types for both expressions separately, and when they don’t match up, outputs the difference as best it can.
Let’s see what happens with an explicit type annotation to help the compiler out:
type t = [
  | `Add of t * t
  | `Sub of t * t
  | `Mul of t * t
  | `Num of int
]

let rec algebra (x:t) =
  match x with
  | `Add (x,y) -> (algebra x) + (algebra y)
  | `Sub (x,y) -> (algebra x) - (algebra y)
  | `Mul (x,y) -> (algebra x) * (algebra y)
  | `Num x     -> x

let _ =
  algebra (
    `Add (
      (`Num 0),
      (`Sub (
          (`Num 1),
          (`Mul (
              (`Nu 3),(`Num 2)
            ))
        ))
    ))
This code contains exactly the same error as before, but we’ve added a closed type definition of the polymorphic variants, and a type annotation to the algebra definition. The compiler error we get is much more useful now:
ocamlc -i broken_poly_with_annot.ml
>File "broken_poly_with_annot.ml", line 22, characters 14-21:
>22 |               (`Nu 3),(`Num 2)
>                   ^^^^^^^
>Error: This expression has type [> `Nu of int ]
>       but an expression was expected of type t
>       The second variant type does not allow tag(s) `Nu
[2]
This error points directly to the correct line number that contains the typo. Once you fix the problem, you can remove the manual annotations if you prefer more succinct code. You can also leave the annotations there, of course, to help with future refactoring and debugging.
Enforcing principal typing
The compiler also has a stricter principal type checking mode that is activated via the -principal flag. This warns about risky uses of type information to ensure that the type inference has one principal result. A type is considered risky if the success or failure of type inference depends on the order in which subexpressions are typed.
The principality check only affects a few language features:
Polymorphic methods for objects
Permuting the order of labeled arguments in a function from their type definition
Discarding optional labeled arguments
Generalized algebraic data types (GADTs) present from OCaml 4.0 onward
Automatic disambiguation of record field and constructor names (since OCaml 4.1)
Here’s an example of principality warnings when used with record disambiguation.
type s = { foo: int; bar: unit }
type t = { foo: int }

let f x =
  x.bar;
  x.foo
Inferring the signature with -principal will show you a new warning:
ocamlc -i -principal non_principal.ml
>File "non_principal.ml", line 6, characters 4-7:
>6 |   x.foo
>        ^^^
>Warning 18: this type-based field disambiguation is not principal.
>type s = { foo : int; bar : unit; }
>type t = { foo : int; }
>val f : s -> int
This example isn’t principal, since the inferred type for x.foo is guided by the inferred type of x.bar, whereas principal typing requires that each subexpression’s type can be calculated independently. If the x.bar use is removed from the definition of f, its argument would be of type t and not type s.
You can fix this either by permuting the order of the type declarations, or by adding an explicit type annotation:
type s = { foo: int; bar: unit }
type t = { foo: int }

let f (x:s) =
  x.bar;
  x.foo
There is now no ambiguity about the inferred types, since we’ve explicitly given the argument a type, and the order of inference of the subexpressions no longer matters.
ocamlc -i -principal principal.ml
>type s = { foo : int; bar : unit; }
>type t = { foo : int; }
>val f : s -> int
The dune equivalent is to add the flag -principal to your build description.
(executable
  (name principal)
  (flags :standard -principal)
  (modules principal))

(executable
  (name non_principal)
  (flags :standard -principal)
  (modules non_principal))
The :standard directive will include all the default flags, and then -principal will be appended after those in the compiler build flags.
dune build principal.exe
dune build non_principal.exe
>File "non_principal.ml", line 6, characters 4-7:
>6 |   x.foo
>        ^^^
>Error (warning 18): this type-based field disambiguation is not principal.
[1]
Ideally, all code should systematically use -principal. It reduces variance in type inference and enforces the notion of a single known type. However, there are drawbacks to this mode: type inference is slower, and the cmi files become larger. This is generally only a problem if you extensively use objects, which usually have larger type signatures to cover all their methods.
If compiling in principal mode works, it is guaranteed that the program will pass type checking in non-principal mode, too. Bear in mind that the cmi files generated in principal mode differ from the default mode. Try to ensure that you compile your whole project with it activated. Getting the files mixed up won’t let you violate type safety, but it can result in the type checker failing unexpectedly very occasionally. In this case, just recompile with a clean source tree.
Modules and Separate Compilation
The OCaml module system enables smaller components to be reused effectively in large projects while still retaining all the benefits of static type safety. We covered the basics of using modules earlier in Chapter 4, Files Modules And Programs. The module language that operates over these signatures also extends to functors and first-class modules, described in Chapter 9, Functors and Chapter 10, First Class Modules, respectively.
This section discusses how the compiler implements them in more detail. Modules are essential for larger projects that consist of many source files (also known as compilation units). It’s impractical to recompile every single source file when changing just one or two files, and the module system minimizes such recompilation while still encouraging code reuse.
The mapping between files and modules
Individual compilation units provide a convenient way to break up a big module hierarchy into a collection of files. The relationship between files and modules can be explained directly in terms of the module system.
Create a file called alice.ml with the following contents:
let friends = [ Bob.name ]and a corresponding signature file:
val friends : Bob.t listThese two files are exactly analogous to including the following code directly in another module that references Alice:
module Alice : sig
  val friends : Bob.t list
end = struct
  let friends = [ Bob.name ]
end
Defining a module search path
In the preceding example, Alice also has a reference to another module Bob. For the overall type of Alice to be valid, the compiler also needs to check that the Bob module contains at least a Bob.name value and defines a Bob.t type.
The type checker resolves such module references into concrete structures and signatures in order to unify types across module boundaries. It does this by searching a list of directories for a compiled interface file matching that module’s name. For example, it will look for alice.cmi and bob.cmi on the search path and use the first ones it encounters as the interfaces for Alice and Bob.
The module search path is set by adding -I flags to the compiler command line with the directory containing the cmi files as the argument. Manually specifying these flags gets complex when you have lots of libraries, and is the reason why the OCamlfind frontend to the compiler exists. OCamlfind automates the process of turning third-party package names and build descriptions into command-line flags that are passed to the compiler command line.
By default, only the current directory and the OCaml standard library will be searched for cmi files. The Pervasives module from the standard library will also be opened by default in every compilation unit. The standard library location is obtained by running ocamlc -where and can be overridden by setting the CAMLLIB environment variable. Needless to say, don’t override the default path unless you have a good reason to (such as setting up a cross-compilation environment).
Inspecting Compilation Units with ocamlobjinfo
For separate compilation to be sound, we need to ensure that all the cmi files used to type-check a module are the same across compilation runs. If they vary, this raises the possibility of two modules checking different type signatures for a common module with the same name. This in turn lets the program completely violate the static type system and can lead to memory corruption and crashes.
OCaml guards against this by recording a MD5 checksum in every cmi. Let’s examine our earlier typedef.ml more closely:
ocamlc -c typedef.ml
ocamlobjinfo typedef.cmi
>File typedef.cmi
>Unit name: Typedef
>Interfaces imported:
>   cdd43318ee9dd1b187513a4341737717    Typedef
>   9b04ecdc97e5102c1d342892ef7ad9a2    Pervasives
>   79ae8c0eb753af6b441fe05456c7970b    CamlinternalFormatBasics
ocamlobjinfo examines the compiled interface and displays what other compilation units it depends on. In this case, we don’t use any external modules other than Pervasives. Every module depends on Pervasives by default, unless you use the -nopervasives flag (this is an advanced use case, and you shouldn’t normally need it).
The long alphanumeric identifier beside each module name is a hash calculated from all the types and values exported from that compilation unit. It’s used during type-checking and linking to ensure that all of the compilation units have been compiled consistently against one another. A difference in the hashes means that a compilation unit with the same module name may have conflicting type signatures in different modules. The compiler will reject such programs with an error similar to this:
$ ocamlc -c foo.ml
File "foo.ml", line 1, characters 0-1:
Error: The files /home/build/bar.cmi
       and /usr/lib/ocaml/map.cmi make inconsistent assumptions
       over interface Map
This hash check is very conservative, but ensures that separate compilation remains type-safe all the way up to the final link phase. Your build system should ensure that you never see the preceding error messages, but if you do run into it, just clean out your intermediate files and recompile from scratch.
Packing Modules Together
The module-to-file mapping described so far rigidly enforces a 1:1 mapping between a top-level module and a file. It’s often convenient to split larger modules into separate files to make editing easier, but still compile them all into a single OCaml module.
The -pack compiler option accepts a list of compiled object files ( .cmo in bytecode and .cmx for native code) and their associated .cmi compiled interfaces, and combines them into a single module that contains them as submodules of the output. Packing thus generates an entirely new .cmo (or .cmx file) and .cmi that includes the input modules.
Packing for native code introduces an additional requirement: the modules that are intended to be packed must be compiled with the -for-pack argument that specifies the eventual name of the pack. The easiest way to handle packing is to let ocamlbuild figure out the command-line arguments for you, so let’s try that out next with a simple example.
First, create a couple of toy modules called A.ml and B.ml that contain a single value. You will also need a _tags file that adds the -for-pack option for the cmx files (but careful to exclude the pack target itself). Finally, the X.mlpack file contains the list of modules that are intended to be packed under module X. There are special rules in ocamlbuild that tell it how to map %.mlpack files to the packed %.cmx or %.cmo equivalent:
cat A.ml
>let v = "hello"
cat B.ml
>let w = 42
cat _tags
><*.cmx> and not "X.cmx": for-pack(X)
cat X.mlpack
>A
>B
You can now run corebuild to build the X.cmx file directly, but let’s create a new module to link against X to complete the example:
let v = X.A.v
let w = X.B.w
You can now compile this test module and see that its inferred interface is the result of using the packed contents of X. We further verify this by examining the imported interfaces in Test and confirming that neither A nor B are mentioned in there and that only the packed X module is used:
corebuild test.inferred.mli test.cmi
>ocamlfind ocamldep -package core -ppx 'ppx-jane -as-ppx' -modules test.ml > test.ml.depends
>ocamlfind ocamldep -package core -ppx 'ppx-jane -as-ppx' -modules A.ml > A.ml.depends
>ocamlfind ocamldep -package core -ppx 'ppx-jane -as-ppx' -modules B.ml > B.ml.depends
>ocamlfind ocamlc -c -w A-4-33-40-41-42-43-34-44 -strict-sequence -g -bin-annot -short-paths -thread -package core -ppx 'ppx-jane -as-ppx' -o A.cmo A.ml
>ocamlfind ocamlc -c -w A-4-33-40-41-42-43-34-44 -strict-sequence -g -bin-annot -short-paths -thread -package core -ppx 'ppx-jane -as-ppx' -o B.cmo B.ml
>ocamlfind ocamlc -pack -g -bin-annot A.cmo B.cmo -o X.cmo
>ocamlfind ocamlc -i -thread -short-paths -package core -ppx 'ppx-jane -as-ppx' test.ml > test.inferred.mli
>ocamlfind ocamlc -c -w A-4-33-40-41-42-43-34-44 -strict-sequence -g -bin-annot -short-paths -thread -package core -ppx 'ppx-jane -as-ppx' -o test.cmo test.ml
cat _build/test.inferred.mli
>val v : string
>val w : int
ocamlobjinfo _build/test.cmi
>File _build/test.cmi
>Unit name: Test
>Interfaces imported:
>   7b1e33d4304b9f8a8e844081c001ef22    Test
>   27a343af5f1904230d1edc24926fde0e    X
>   9b04ecdc97e5102c1d342892ef7ad9a2    Pervasives
>   79ae8c0eb753af6b441fe05456c7970b    CamlinternalFormatBasics
Packing and Search Paths
One very common build error that happens with packing is confusion resulting from building the packed cmi in the same directory as the submodules. When you add this directory to your module search path, the submodules are also visible. If you forget to include the top-level prefix (e.g., X.A) and instead use a submodule directly (A), then this will compile and link fine.
However, the types of A and X.A are not automatically equivalent so the type checker will complain if you attempt to mix and match the packed and unpacked versions of the library.
This mostly only happens with unit tests, since they are built at the same time as the library. You can avoid it by being aware of the need to open the packed module from the test, or only using the library after it has been installed (and hence not exposing the intermediate compiled modules).
Shorter Module Paths in Type Errors
Core uses the OCaml module system quite extensively to provide a complete replacement standard library. It collects these modules into a single Std module, which provides a single module that needs to be opened to import the replacement modules and functions.
There’s one downside to this approach: type errors suddenly get much more verbose. We can see this if you run the vanilla OCaml toplevel (not utop).
$ ocaml
# List.map print_endline "" ;;
Error: This expression has type string but an expression was expected of type
         string list
This type error without Core has a straightforward type error. When we switch to Core, though, it gets more verbose:
$ ocaml
# open Core ;;
# List.map ~f:print_endline "" ;;
Error: This expression has type string but an expression was expected of type
         'a Core.List.t = 'a list
The default List module in OCaml is overridden by Core.List. The compiler does its best to show the type equivalence, but at the cost of a more verbose error message.
The compiler can remedy this via a so-called short paths heuristic. This causes the compiler to search all the type aliases for the shortest module path and use that as the preferred output type. The option is activated by passing -short-paths to the compiler, and works on the toplevel, too.
$ ocaml -short-paths
# open Core;;
# List.map ~f:print_endline "foo";;
Error: This expression has type string but an expression was expected of type
         'a list
The utop enhanced toplevel activates short paths by default, which is why we have not had to do this before in our interactive examples. However, the compiler doesn’t default to the short path heuristic, since there are some situations where the type aliasing information is useful to know, and it would be lost in the error if the shortest module path is always picked.
You’ll need to choose for yourself if you prefer short paths or the default behavior in your own projects, and pass the -short-paths flag to the compiler if you need it.
The Typed Syntax Tree
When the type checking process has successfully completed, it is combined with the AST to form a typed abstract syntax tree. This contains precise location information for every token in the input file, and decorates each token with concrete type information.
The compiler can output this as compiled cmt and cmti files that contain the typed AST for the implementation and signatures of a compilation unit. This is activated by passing the -bin-annot flag to the compiler.
The cmt files are particularly useful for IDE tools to match up OCaml source code at a specific location to the inferred or external types.
Using ocp-index for Autocompletion
One such command-line tool to display autocompletion information in your editor is ocp-index. Install it via OPAM as follows:
opam install ocp-index
ocp-index
Let’s refer back to our Ncurses binding example from the beginning of Chapter 19, Foreign Function Interface. This module defined bindings for the Ncurses library. First, compile the interfaces with -bin-annot so that we can obtain the cmt and cmti files, and then run ocp-index in completion mode:
(cd ffi/ncurses && corebuild -pkg ctypes.foreign -tag bin_annot ncurses.cmi)
>ocamlfind ocamldep -package ctypes.foreign -package core -ppx 'ppx-jane -as-ppx' -modules ncurses.mli > ncurses.mli.depends
>ocamlfind ocamlc -c -w A-4-33-40-41-42-43-34-44 -strict-sequence -g -bin-annot -short-paths -thread -package ctypes.foreign -package core -ppx 'ppx-jane -as-ppx' -o ncurses.cmi ncurses.mli
ocp-index complete -I ffi Ncur
ocp-index complete -I ffi Ncurses.a
ocp-index complete -I ffi Ncurses.
You need to pass ocp-index a set of directories to search for cmt files in, and a fragment of text to autocomplete. As you can imagine, autocompletion is invaluable on larger codebases. See the ocp-index home page for more information on how to integrate it with your favorite editor.
Examining the Typed Syntax Tree Directly
The compiler has a couple of advanced flags that can dump the raw output of the internal AST representation. You can’t depend on these flags to give the same output across compiler revisions, but they are a useful learning tool.
We’ll use our toy typedef.ml again:
type t = Foo | Bar
let v = Foo
Let’s first look at the untyped syntax tree that’s generated from the parsing phase:
ocamlc -dparsetree typedef.ml 2>&1
>[
>  structure_item (typedef.ml[1,0+0]..[1,0+18])
>    Pstr_type Rec
>    [
>      type_declaration "t" (typedef.ml[1,0+5]..[1,0+6]) (typedef.ml[1,0+0]..[1,0+18])
>        ptype_params =
>          []
>        ptype_cstrs =
>          []
>        ptype_kind =
>          Ptype_variant
>            [
>              (typedef.ml[1,0+9]..[1,0+12])
>                "Foo" (typedef.ml[1,0+9]..[1,0+12])
>                []
>                None
>              (typedef.ml[1,0+13]..[1,0+18])
>                "Bar" (typedef.ml[1,0+15]..[1,0+18])
>                []
>                None
>            ]
>        ptype_private = Public
>        ptype_manifest =
>          None
>    ]
>  structure_item (typedef.ml[2,19+0]..[2,19+11])
>    Pstr_value Nonrec
>    [
>      <def>
>        pattern (typedef.ml[2,19+4]..[2,19+5])
>          Ppat_var "v" (typedef.ml[2,19+4]..[2,19+5])
>        expression (typedef.ml[2,19+8]..[2,19+11])
>          Pexp_construct "Foo" (typedef.ml[2,19+8]..[2,19+11])
>          None
>    ]
>]
This is rather a lot of output for a simple two-line program, but it shows just how much structure the OCaml parser generates even from a small source file.
Each portion of the AST is decorated with the precise location information (including the filename and character location of the token). This code hasn’t been type checked yet, so the raw tokens are all included.
The typed AST that is normally output as a compiled cmt file can be displayed in a more developer-readable form via the -dtypedtree option:
ocamlc -dtypedtree typedef.ml 2>&1
>[
>  structure_item (typedef.ml[1,0+0]..typedef.ml[1,0+18])
>    Tstr_type Rec
>    [
>      type_declaration t/80 (typedef.ml[1,0+0]..typedef.ml[1,0+18])
>        ptype_params =
>          []
>        ptype_cstrs =
>          []
>        ptype_kind =
>          Ttype_variant
>            [
>              (typedef.ml[1,0+9]..typedef.ml[1,0+12])
>                Foo/81
>                []
>                None
>              (typedef.ml[1,0+13]..typedef.ml[1,0+18])
>                Bar/82
>                []
>                None
>            ]
>        ptype_private = Public
>        ptype_manifest =
>          None
>    ]
>  structure_item (typedef.ml[2,19+0]..typedef.ml[2,19+11])
>    Tstr_value Nonrec
>    [
>      <def>
>        pattern (typedef.ml[2,19+4]..typedef.ml[2,19+5])
>          Tpat_var "v/83"
>        expression (typedef.ml[2,19+8]..typedef.ml[2,19+11])
>          Texp_construct "Foo"
>          []
>    ]
>]
The typed AST is more explicit than the untyped syntax tree. For instance, the type declaration has been given a unique name (t/1008), as has the v value (v/1011).
You’ll rarely need to look at this raw output from the compiler unless you’re building IDE tools such as ocp-index, or are hacking on extensions to the core compiler itself. However, it’s useful to know that this intermediate form exists before we delve further into the code generation process next, in Chapter 24, The Compiler Backend Byte Code And Native Code.
There are several new integrated tools emerging that combine these typed AST files with common editors such as Emacs or Vim. The best of these is Merlin, which adds value and module autocompletion, displays inferred types and can build and display errors directly from within your editor. There are instructions available on its homepage for configuring Merlin with your favorite editor.